9 minutes
Raytracer 5: GPU, OpenGL and Compute Shaders
I bought a new computer for myself. And the first thing I tried, porting my raytracer to the Windows platform and try it on the new CPU. And the performance went up to 0.000007ms/ray on 6 core CPU. This is 3x speedup from my old laptop which has 2 core CPU. So multithreading scales up linearly. That's good!.
Emissive Materials
The next feature I wanted to add to the raytracer is the lighting. Currently, all scene illuminated with skylight.
Kinda cool to have emissive spheres in our scene. And that turned out really easy to implement.
I just added emitColor property to the Material struct. On raytracing loop:
/* If bounce hit sphere */

// Add the attenuated emit color to result color.
result += attenuation * mat.emitColor;
// Keep continue attenuation
attenuation *= mat.color;

/* Keep continue to bouncing */
And we got:
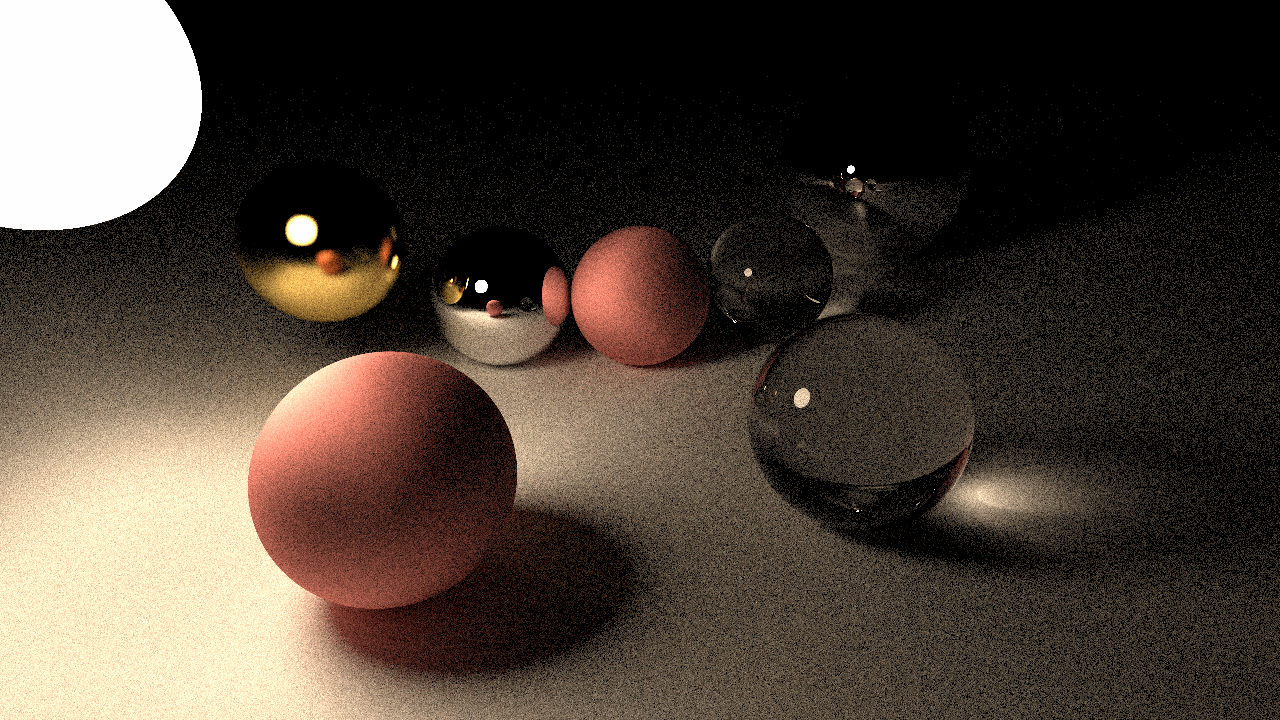
Looks good but too noisy. We need more samples to generate reasonable image.
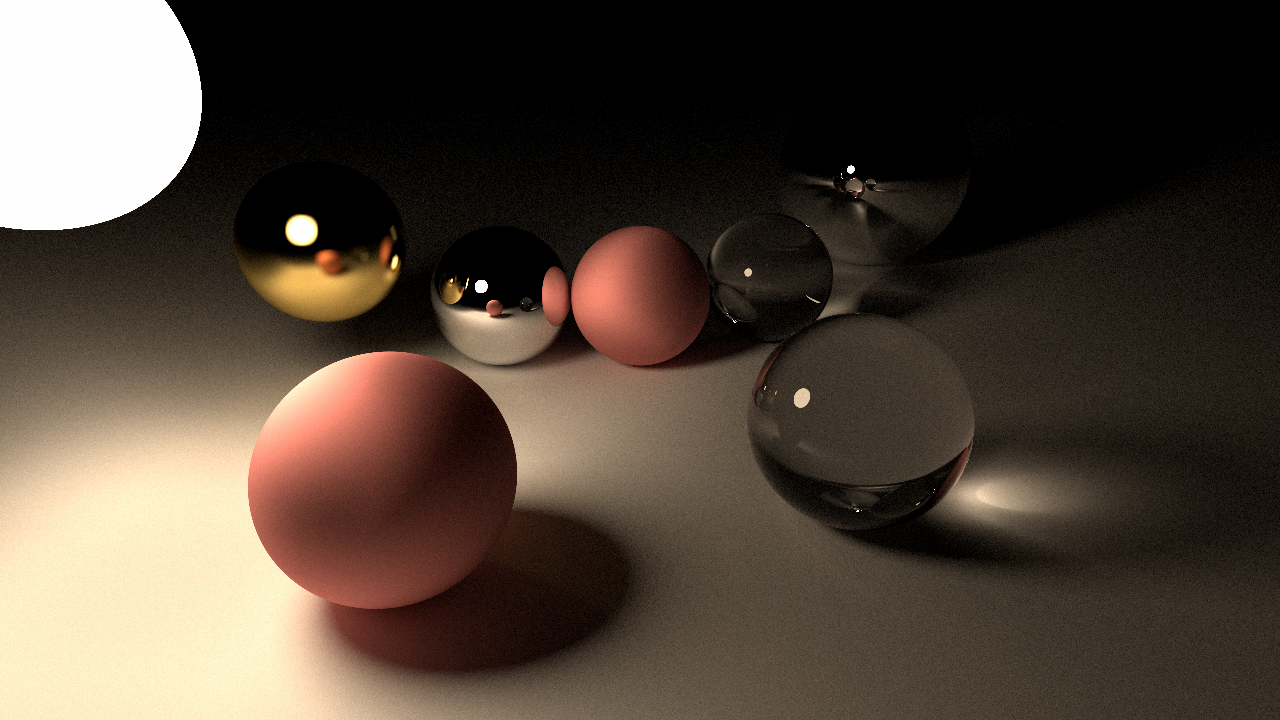
This one rendered with 8000 spp. Less noisy but our execution time is too long now. This image rendered in almost 3 minutes. Since I have brought a new computer and it has a very decent GPU and we need more performance, I think we can try to run our raytracer into GPU.
Implementation
I'm not gonna talk about what GPU is and what is rendering pipeline. Since you are reading this blog, you probably know already and there are amazing pieces of information out there. I will be using compute shaders for this implementation. Since we have written our raytracer on CPU and I want a copy-paste level easy port(because I'm lazy), compute shader is an obvious choice. It has a similar multithreading execution model that we use on the CPU.
So, compute shader is going to do all the same work that CPU doing. Then it is going to produce the image as a texture object and send the texture into the fragment shader. The fragment shader is going to gamma correct our image and render the image to the screen.
In this implementation, I am going to use OpenGL. Since it is kinda easy and I know it at the basic level, we can go with that. OpenGL got computer shader support in version 4.3 but we are going with version 4.5.
Window Creation
I started with the window and context creation code. I used Win32 API for window management because I didn't want to use a 3rd party library for this.
There is a little tricky situation about GL context creation. To able to create GL context with attributes,
we have to use WGL extension called wglCreateContextAttribsARB. That extension
gives us a modern context that we can use. But in able to use WGL extensions, we have use context. So we have to create an old context then load WGL extensions then
create modern context and use it:
// Create OpenGL context
HGLRC wglContext = wglCreateContext(deviceContext);
// To able to use wgl extensions, we have to make current a WGL context.
// Otherwise we can't get function pointers to WGL extensions.
wglMakeCurrent(deviceContext, wglContext);

// Load WGL extensions.
gladLoadWGL(deviceContext);

int glAttribs[] = {
    WGL_CONTEXT_MAJOR_VERSION_ARB, 4,
    WGL_CONTEXT_MINOR_VERSION_ARB, 5,
    WGL_CONTEXT_FLAGS_ARB, WGL_CONTEXT_DEBUG_BIT_ARB,
    WGL_CONTEXT_PROFILE_MASK_ARB,  WGL_CONTEXT_CORE_PROFILE_BIT_ARB,
    0,
};

// Create new WGL context with attributes, using WGL extensions.
// And make current the new one and delete the old one.
HGLRC newContext = wglCreateContextAttribsARB(deviceContext, 0, glAttribs);
wglMakeCurrent(deviceContext, newContext);
wglDeleteContext(wglContext);
Rest of the window creation code is pretty straight forward.
Shaders
On writing shaders, we are lucky. Because most of the shader programming languages are very similar to C++. We can just copy-paste our raytracer code to the computer shader file. One thing different is that data type and common function names are not the same as in the CPU version. So I used macros for type name defines.
Another problem that we have is how we send scene data into the compute shader. So there are two popular options for that.
Uniform Buffer Objects or Shader Storage Buffer Objects.
UBOs are for small fast-access type data. SSBOs are for bigger data types.
I choose SSBO over UBO because SSBO supports variable size arrays. And I like to pass our scene elements to shaders without specifying fixed-size.
It is almost the same as the other buffer objects in GLSL. We can define SSBO simply put buffer for type:
layout(shared, binding = 0) buffer MaterialBuffer {
    Material gMaterials[]; // Variable size array
};
Alignment
So that went easy but we have a problem now. The alignment of SSBO structs is not the same as C++ ones. According to OpenGL specs: > If the member is a structure, the base alignment of the structure is N, where N is the largest base alignment value of any of its members ...
In our case, we have vec3 in our structs. Size of vec3 is 12 bytes but vec3 count as vec4. So our alignment for structs should be 16. This can be done in many ways. You can put padding data into the structs.
Or we can define offsets and tweak layout properties using enhanced layout extension.
For example the Material struct:
struct Material {
    // These two can be bundled as a vector4. First three component for color and 4th component for refractiveIndex;
    Vector3 color;
    float refractiveIndex;

    // These two too
    Vector3 emitColor;
    float reflection;
};
This type of layout packing can be done in GLSL like this:
struct Material {
    // In GLSL, all the vec3 type variables aligned to 16 bytes (vec4).
    // We can use extra float padding with enhanced layout extension.
    // layout(component = 3) means w component of vec4 holds this value.
    vec3 color;
    layout(component = 3) float refractiveIndex;
    vec3 emitColor;
    layout(component = 3) float reflection;
};
And it is worked pretty well on Intel Integrated GPU. I didn't have to align memory in C++ code. But enhanced layout extension doesn't supported in compute shaders on Nvidia GPUs. So I gave up on that and ended up aligning structs in C++ code.
// Align this struct members to 16 byte.
__declspec(align(16)) struct Material {
    Vector3 color;
    float refractiveIndex;
    Vector3 emitColor;
    float reflection;
};
Errors
When you coding an OpenGL app, you often end up with a black screen.
We need to find errors causing a black screen. First, we need to create our OpenGL context with debug properties.
Second, we need to fetch errors and print them, so we can look at it. Previously, this can be done with the glGetError function.
You have to put this function after every GL function. But, in version 4.3 they added a debug callback feature.
Now you can simply write a message proc function and add to debug output using glDebugMessageCallback function.
I can't find any compute shader debugger for OpenGL. So it went hard to finding errors and fixing them. One particular is TDR.
TDR
When I managed to do raytracing in the integrated GPU, I immediately switched the default GPU to 1050Ti. Just for seeing how much faster. On integrated GPU it rendered 2048 spp image around 5 seconds. I wanted to know how much speedup we gain from Nvidia GPU. The same working program always crashed on the dedicated GPU. There was no error in GL debug output. There was no hint about what caused the problem. So I searched an Nvidia GPU crash diagnoser and I found Nvidia Aftermath. The exact tool I was looking for. But guess what? It doesn't support OpenGL. But when I looked at a video about Aftermath, there is a chart about GPU crashes:
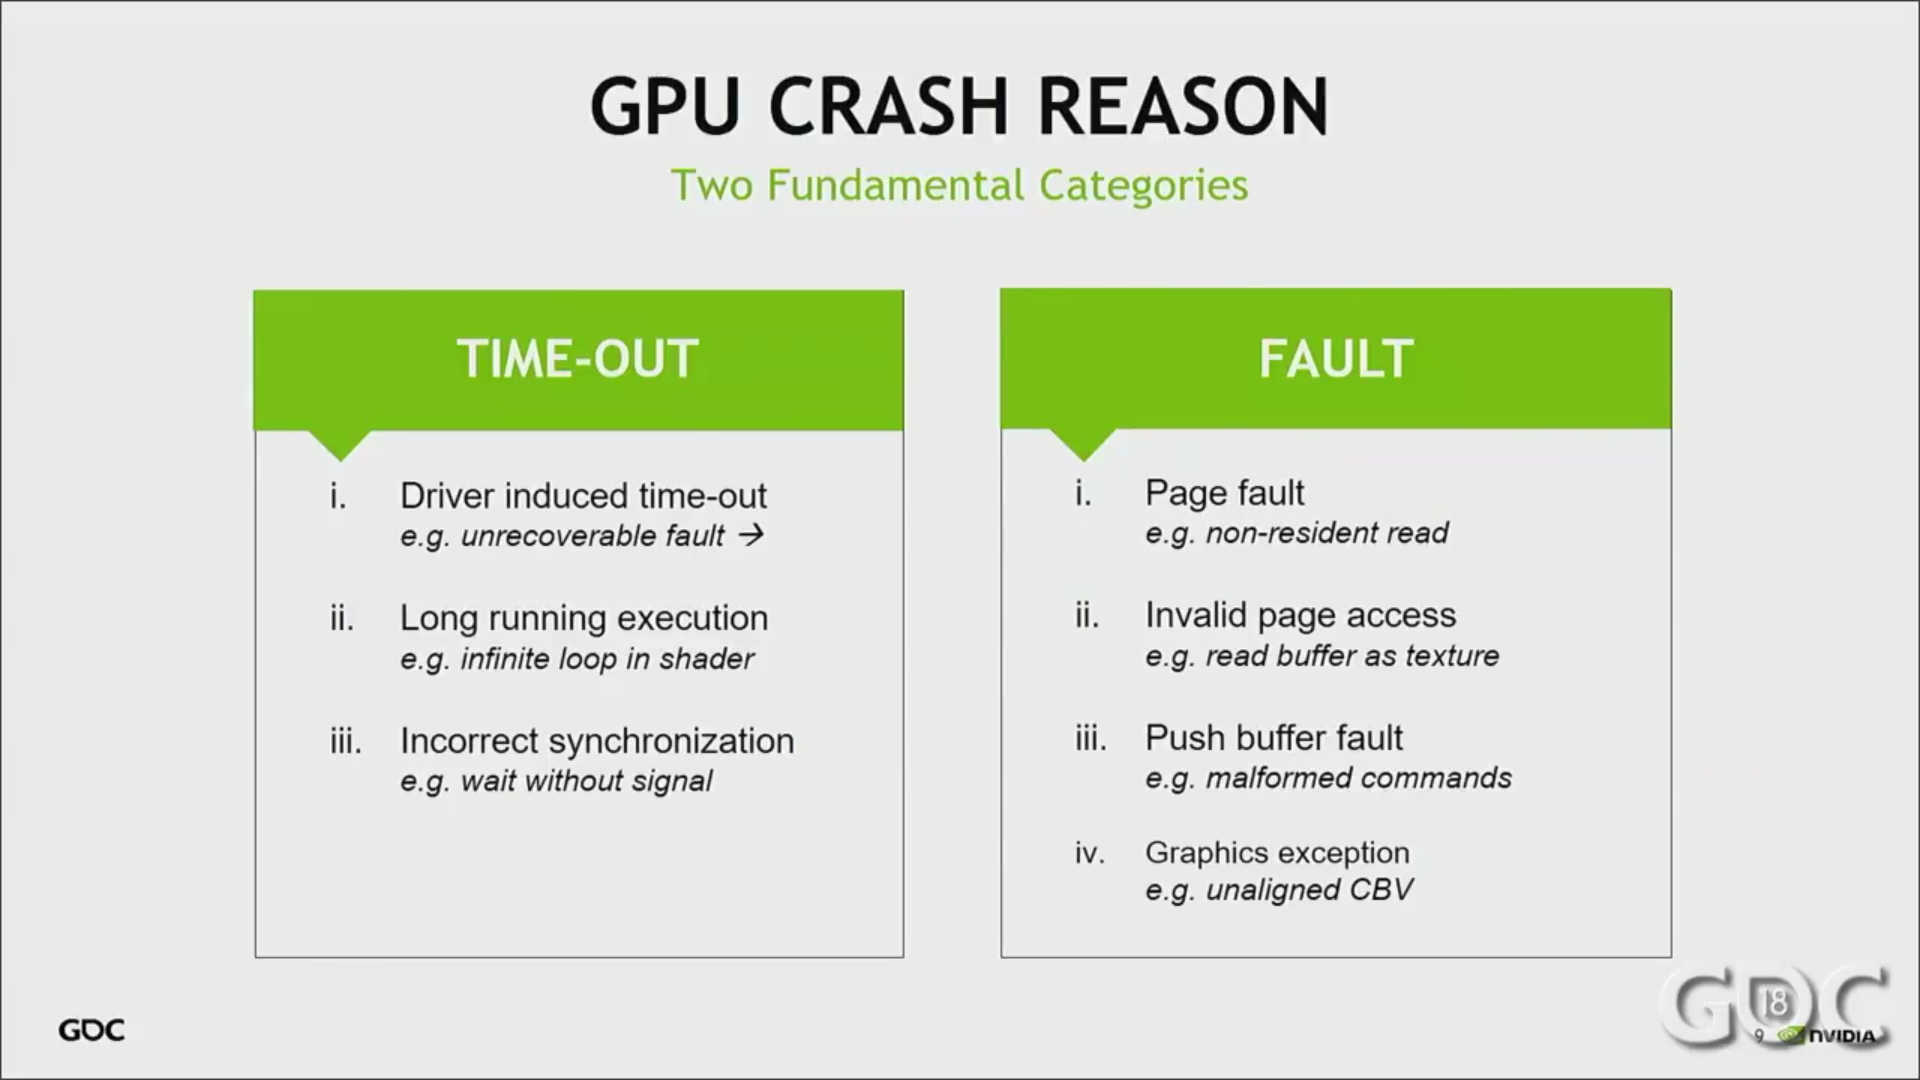
There is one caught my eye which says "Long Running Execution". So decreased the sample size and tried again. And it worked. So the problem was something called Timeout Detection & Recovery. If you use %100 of dedicated GPU period of time (default 2 sec), Windows is going to reset the GPU. That is what happened to me.
"Progressive Rendering"
All production raytracers behave like: it generates a very poor sampled image and it improves the image by continuing to sampling as the program runs. I wanted to add this feature. So the idea is that we add a new image to the averaged image in every frame.
// First image previously sampled image.
layout(rgba32f, location = 0) readonly uniform image2D srcImage;
// Output image.
layout(rgba32f, location = 1) writeonly uniform image2D destImage;
...
// Number of frames averaged into srcImage
layout(location = 4) uniform uint32_t frameIndex;

...

// Calcualte the sum of all previous samples
Vector3 sumColor = prevColor * frameIndex;
// Add new color to sum, then re-average it.
Vector3 finalColor = (color + sumColor) / (frameIndex + 1);
Performance
To able to measure performance, I needed to figure out how to count ray bounces. There is an Atomic Counter in OpenGL. First, I tried the atomic counter but atomic counters only support increment and decrement operations. If you want to use more atomic algebra operations you have to use OpenGL in version 4.6 or an extension. I didn't want to do it. So instead of atomic counters, I used SSBO again for the counter. Then use naive atomic add operation. It worked with the same performance if we did with atomic counter buffers. After compute shader finished its job, I mapped the bounce count SSBO for reading bounce count.
// GLSL code
layout(binding = 3) buffer Counter {
    uint32_t gBounceCount;
};
...
atomicAdd(gBounceCount, totalBounces);

// C++ code
glBindBuffer(GL_SHADER_STORAGE_BUFFER, bounceCountSSBO);
uint32_t* counter = (uint32_t*) glMapBuffer(GL_SHADER_STORAGE_BUFFER, GL_READ_ONLY);
uint32_t bounceCount = counter[0];
glUnmapBuffer(GL_SHADER_STORAGE_BUFFER);
On integrated GPU, program runs 47ms 0.0000025ms/ray for per frame. It is more than 2.5x speedup from CPU.
On Nvidia 1050Ti, program runs 14ms 0.0000008ms/ray for per frame. This is nearly 10x faster than CPU.
Learnings
Now we have a raytracer that runs on GPU. Cool but now we have 2 raytracers actually. We literally copied the same code on the CPU. Now we have to implement all the features for both sides. That is not a very good approach. In the future, we'll put raytracing code into a shared header or something. But It's okay for now.
Here are things that I learned from implementing GPU port: - Even with copy-paste like implementation, GPU runs code way faster than CPU. We did nothing to optimize yet. That's impressive! - OpenGL can be simple (I think it's not) but I had a hard time on debugging because of lack of debugging tools. Especially for compute shaders, I can't find any tool. I think starters shouldn't start with APIs which easy to use, they should start with the one which got most debugging tools. Because when you go a little bit further, you are alone with debugging tools. - One of the problems I had on GPU porting is that GLSL doesn't map memory into zeros. It doesn't have a constructor that we use in C++ for filling struct memory with zeros. You should aware of that. - The biggest problem that caused a black screen was alignment. When using UBO or SSBO, you should take alignment into count.
1838 Words
2019-06-26 17:29 +0300